Friday, May 8, 2009

Bring Windows 7 Calculator to Windows Vista

Note: this's for windows Vista, not for XP.

The next version of Windows called as Windows 7 which is expected to be launched as soon as the fall of 2009, has some major changes. I am not sure what took Microsoft so long to revamp Windows components like paint, notepad and similar utilities. However, it’s better be late than never and living by this ideology, Windows 7 will have some a major revamp to the above mentioned application.
Microsoft is also going to give a new version of calculator with Windows 7. It’s not that the current calculator is not great. It does have some good features in scientific mode. But the new calculator is going to be a state of art calculator. The current calculator has 2 modes namely standard and scientific. But the new calculator will be a state of art calculator which promises to have 4 modes. These modes are:
Standard
Scientific
Programmer
Statistics

me work on user interface and the calculator has much improved display.
You don’t have to wait for to release. You can start using it right away. The calculator has been ported from Windows 7 pre-beta build 6801.

You can just extract the files from the rar archive and double click on calc.exe to start using it or, you can replace your existing calculator of Windows Vista with this one. Just follow the steps below:
  1. copy calc.exe to C:\Windows\System32\
  2. copy calc.exe.mui (in en-US folder) to C:\Windows\System32\en-US\
Beacuse you’ll be overwriting the existing calculator files of Vista, it’s a good idea that you take a back of the files which will be overwritten.

______________
Via Tnerd [Hate ziddu link]

Blue Badge - Unlock hidden features of windows 7

As the dialog indicates, patched files are not backed up. I suggest all users back up, by copying into a temporary folder somewhere, the following files:
  • \Windows\Explorer.exe
  • \Windows\System32\wisptis.exe
  • \Windows\System32\ieframe.dll
  • \Windows\System32\shell32.dll
  • \Windows\System32\stobject.dll
  • \Windows\System32\TabletPC.cpl
  • \Windows\System32\themecpl.dll
  • \Windows\System32\themeui.dll
  • \Windows\System32\powercfg.cpl
Understanding the risks involved in patching core system files, you may download a copy of the tool for x86 or x64 (delayed due to issues). Please keep in mind this tool is not affiliated, sponsored, supported by, written by, or endorsed by Microsoft Corporation.
Update: Blue Badge is compatible with previously patched (superbar) systems.


1.) Size: 19.83 KB
NOTE: This is x86 32bit build only.
2.) Run above file from the desktop.
3.) Click “Yes” on the UAC prompt.
4.) You will see a cmd window flash, that simply backups the files to your desktop under the “Blue Badge BackUp” folder which was just created. So keep this folder just in case.
5.) You should see the “Blue Badge” application now. So click on “I understand the risks, continue.”
6.) Click “ok” on the patching complete screen. Reboot! Your done! Simple um? he-he
NOTE: Feel free to now delete BlueBadgeBackUp.exe, BlueBadge.exe, and BlueBadgeBackUp.cmd from your desktop as they are no longer needed.
Enjoy,

Wednesday, May 6, 2009

Windows 7 Parental Controls

Parental controls help you manage how you want other users to use the Windows 7 PC. You can set limits on the games your children can play and also the hours that your children can use the computer and also the application they can use. Parental Controls blocks access to any particular game or program and displays a notification is displayed that the program has been blocked. Parental controls can be configured using an administrator account.

Windows 7

To set up parental controls, you need to make sure the user account is a standard account on Windows 7. Open control panel and click on Parental controls in all control panel items, alternatively you can also type parental controls in the start menu search. In the parental controls, select the account on which you want to have the restrictions enforced.

Set up parental controls

Enable the parental control for this account using the radio button option. You can change/control the time limits for this account, control the games by rating and content, set up web filter and also block specific programs.

Time limits

Block Games for the user based on ratings

Games blocked

Control which application can be run by this user.

block application

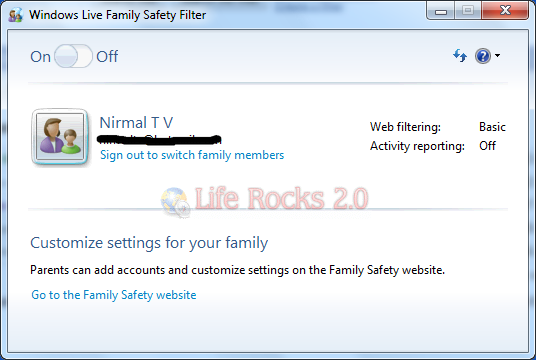
Finally you can also set up Windows Live family safety filter and put a restriction on the sites visited.

Family safty

Family safety filter can be set up for each family member with the Windows Live ID.

Create a Power Plan in Windows 7

Windows 7 is build such that it helps reduce power consumption by working with the latest hardware power-management capabilities and better managing how application processes use the processor. Windows 7 includes device driver support for the latest processor power-management technologies from leading independent hardware vendors. Windows 7 comes with build in power plans, but you can create your own plan if you do not want to alter the default settings.

To create a new power plan, open the Power Options in the Control panel (All Control Panel Items-> Power Options or you can type power options in the start menu search). In the power Options, click on Create a Power Plan in the left sidebar.

Create power plan

Click on the next button and enter the power settings you would like to have in this plan. You need to choose the sleep and display settings.

Power settings

Once you have done with the customizations, click the create button and the power plan is created. You can also change the advanced power options for this plan.

Advanced power Options

Selecting you own power plan allows you to have better control over the battery and power consumption

Download Windows 7 RC

Microsoft has made available the Windows 7 RC and is now available for public download from Microsoft servers. You can now try the Windows 7 pre-release software and you can see the changes and fixes from the Beta testing. Unlike the beta version, the Release candidate will be available till July 2009 and there is no limit to the product keys, so you have enough time to download the RC.

Windows 7

Some things to know about the RC:

This is pre-release software, so please read the following to get an idea of the risks and key things you need to know before you try the RC.

  • The RC will be available at least through July 2009 and we’re not limiting the number of product keys, so you have plenty of time.
  • The RC will expire on June 1, 2010. Starting on March 1, 2010, your PC will begin shutting down every two hours. Windows will notify you two weeks before the bi-hourly shutdowns start. To avoid interruption, you’ll need to install a non-expired version of Windows before March 1, 2010.
  • Be sure to back up your data and please don’t test the RC on your primary home or business PC.
  • Before installing the RC, please read the Release Notes and Things to Know for important information about the release.
  • Be sure to turn on automatic updates in Windows Update in case we publish updates for the RC.
  • You can install the Windows 7 RC on a PC running Windows Vista without backing up the PC—but we encourage you to make a backup for safe keeping. If you’re running Windows XP or the Windows 7 Beta, you’ll need to backup your data, then do a clean installation of the RC, then reinstall your applications and restore your data.

You can check out the minimum system requirements to install the Windows 7 RC. RC is available in 32 bit and 64 bit versions.

Download Windows 7 RC

How to Migrate from Windows XP to Windows 7

Windows 7 RC is scheduled for public release on May 5th 2009. Many of the Windows users are still using Windows XP and it is the right time to do an upgrade to Windows 7. Upgrading to Windows 7 is a simple process and you will not lose any files and documents which you had in Windows XP. User State Migration Tool (USMT) can be used to migrate user files and settings from Windows XP to Windows 7 using a default installation.

xp to 7

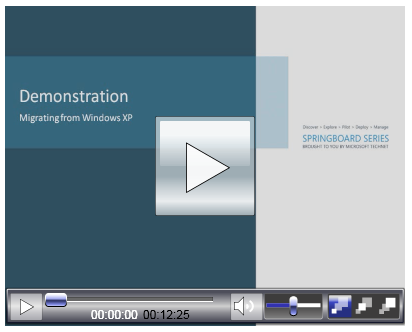
USMT captures desktop, and application settings, as well as user accounts and users’ files, and then migrates them to a new Windows installation. Using USMT can help you improve and simplify your migration process. TechNet has a video demo on how to migrate from Windows XP to Windows 7.

Windows XP to Windows 7

More information on User State Migration Tool (USMT) is available here.

Windows 7 System Requirements

Microsoft will be releasing the Windows 7 RC on May 5th 2009 for the general public and we have confirmed reports that the final version might be coming in October, earlier than expected. Meanwhile Microsoft has released the minimum system requirements to run a Windows 7 PC. Windows 7 requires less system specification especially the memory when compared to Windows Vista. So here are the system requirements for Windows 7. The specification for Windows 7 are lesser compared to the specs released when Vista was made available.

Windows 7

* 1GHz 32-bit or 64-bit processor
* 1GB of RAM
* 16GB of disk space (or 20GB for 64-bit users)
* DirectX 9 graphics device with WDDM 1.0 or higher driver

If you want to run the Window XP mode in Windows 7, Microsoft recommends a PC with a minimum of 2GB of memory and 15 GB of additional disk space. In addition, Windows Virtual PC requires a PC with Intel-VT or AMD-V enabled in the CPU, as it takes advantage of the latest advancements in hardware virtualization.

How to Upgrade from Windows 7 Beta to RC Build?

Now that the RC build is official from Microsoft, users can start downloading the latest RC build 7100 and install it. Microsoft recommends user to do a fresh install even if you have installed the beta version of Windows 7 released in Jan 2009. But it is also possible to upgrade from beta build to RC build using a simple hack. If you want to upgrade from beta to RC, you will need to bypass the check for pre-release as mentioned in the Windows 7 blog.

Windows 7

Steps to upgrade from Beta to RC;

  1. Download the ISO and burn the ISO to a DVD.
  2. Copy the whole image to a storage location you wish to run the upgrade from (a bootable flash drive or a directory on any partition on the machine running the pre-release build).
  3. Browse to the sources directory.
  4. Open the file cversion.ini in a text editor like Notepad.
  5. Modify the MinClient build number to a value lower than the down-level build. You need to change the value to 7000 as it is the beta version build number.
  6. Save the file in place with the same name.
  7. Run setup like you would normally from this modified copy of the image and the version check will be bypassed.

cversion_ini_file

With this change, you can upgrade from the beta version to the RC build.

Windows 7 Coming in October?

Windows 7 RC is just out for MSDN and TechNet users and we have fresh rumors that Windows 7 final release will be coming in October 2009. Acer has confirmed that it will be shipping the new all-in-one Z5600 PC preloaded with Windows 7 on October 23, 2009. This is much earlier than the expected date of Jan 2010 from Microsoft, 3 years after the public release of Windows Vista.

windows 7

acer-aspire-z5600-pc

Acer also confirmed that any Vista-based models purchased in the 30 days prior to this date will be eligible for Microsoft’s free upgrade program. Acer Z5600 is a touch screen PC specifically made for Windows 7 and features 24’ LCD screen touch screen, built-in TV tuner card, Blu-ray recorder, a 2 TB hard drive. Aspire Z5600 can be used like a general mouse and keyboard PC.

There is no official word from Microsoft on the release date of Window 7 yet. Meanwhile the RC of Windows 7 would be available for download on May 5th.

Source

Monitor Real Time Memory and CPU Usage in Windows 7

We have covered many free application which provides you with the real time usage of memory and CPU in Windows. You can also monitor in real time the usage and performance of CPU, Disks, Memory and Network without having to install any other application in Windows 7. The Resource Monitor tool in Windows 7 will provide you with real time updates. It also gives details on the processes using these resources. To open Resource Monitor, Click on Start Menu-> All Programs-> Accessories-> System Tools-> Resource Monitor.

Resouce Monitor

The resource monitor has 5 tabs, the first one shows the overview and the others include CPU, Memory, Disk and Network monitoring.

Resouce Monitor tabs

With the resource monitor, you can examine how programs you run affect your computer’s performance, both in real time and performance monitor helps you by collecting log data for later analysis.

Tuesday, May 5, 2009

Enable BitLocker Drive Encryption in Windows 7

BitLocker Drive Encryption helps you to prevent unauthorized access to any drive in your PC. You will be able to login and use the drives, but any other users or unauthorized users cannot access the drives. With BitLocker encryption, you can protect your personal files and folders in a drive. BitLocker Encryption can be enabled separately on each drives. To use encryption for your drives, open Control Panel and navigate to BitLocker Encryption link.

Control panel Bitlocker

Next you need to select the disk drive which you want to protect and encrypt using BitLocker.

Select drive

Once you have selected the drive, you can protect it using a password or use a smart card to unlock it. In the next step you need to select where the recovery key is to be saved. It is advisable to either save the encryption recovery key in another computer or else you can also print it.

bitlocker encryption

Once you have completed the steps, the BitLocker starts the encryption process. Do not remove the drive if it is a removable drive while encryption process is underway. Now your drive is encrypted and prevented from unauthorized access.

Kaspersky Announces Anti-Virus for Windows 7

Kaspersky Lab has announced that they are ready to provide comprehensive IT security with Windows 7. Initially when Windows 7 beta was released in Jan2009, Kaspersky has released a technical preview of the anti-virus for Windows 7. Now that Windows 7 is getting closer to RC stage, Kaspersky is ready with the AV solution for Windows 7.
of the anti-virus for Windows 7. Now that Windows 7 is getting closer to RC stage, Kaspersky is ready with the AV solution for Windows 7.

Kaspersky

Kaspersky Lab’s suite of security offerings will be available to Windows 7 users immediately following the launch of the new operating system.

“By working with Microsoft, we are confident that Kaspersky Lab will provide Windows 7 users with a security option that is easy-to-manage, and helps protect their valuable data without slowing them down,” said Alexey Kalgin, Director of Product Marketing in Kaspersky Lab’s Corporate Business Division.

The technical preview version was downloaded and installed by more than 300,000 people over two and a half months time. Through its collaboration with Microsoft, Kaspersky Lab is providing premium Internet threat protection to users of Windows 7 as soon it is released.

The new version for Windows 7 is designed based on the feedback it received regarding the speed, reliability and stability of its Windows 7 protection.

Via

View Window Titles in Windows 7

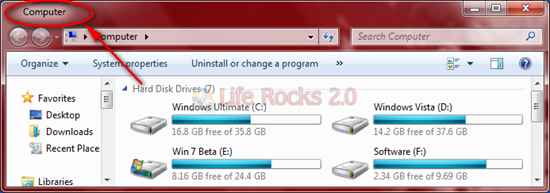
In Windows XP, whenever we open any explorer window, the title of the window would be the folder opened. But in Vista this title bar was blank and so is the case with Windows 7. In Windows 7 as well, the explorer does not show any title. A simple application called Aerobar can show titles in the explorer window. This application which was designed for Vista, also works with Windows 7 and does not require any installation and when running, it shows the titles in Explorer.

Windows explorer

Once you have downloaded the application, you can add it to Windows 7 startup menu. The startup folder is located at C:\ProgramData\Microsoft\Windows\Start Menu\Programs\Startup, where C is the drive where Windows 7 is installed.

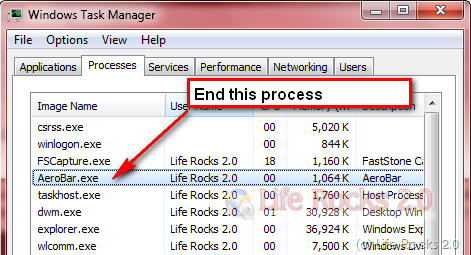
In case you do not want this application, you can remove from the task manager and also from the startup folder.

uninstall Aerobar

Removing this process will make explorer titles blank. Please note that you need to restart the machine after starting this application to show titles.

Download Aerobar

Freewares to Change Windows 7 Logon

Windows 7 Build 7057 had many changes when compared to the beta build and one such change was the new logon screen. If you are not happy with the logon screen of Windows 7, you can change it easily with logon changer. Here are two free application which allows you to select the Windows 7 logon. You can chose your own wallpapers as Windows 7 logon using these applications.

1. W7C Windows 7 Logon UI Changer- This is created by Windows7center and allows you to select any image or wallpaper as your logon. You need to make sure to Run as Administrator. It creates a backup of original logon and also compresses the image to less than 256kb as logon backgrounds need to be less than this size.

Windows 7 Logon Changer

Download

2. Logon Changer for Windows 7- This is created by Tweaks.com and provides an easy way to customize the logon screen background with just a few clicks. Logon Changer will give you the option to automatically resize and recompress the image to the highest quality possible without modifying the original image.

Tweaks.com Logon Changer

Download

If you want the default Windows 7 logon screen back you can always revert it default logon screen and the applications will automatically uninstall any customized screens.

Enable or Disable System Restore in Windows 7

System Restore helps you to restore the computer to a previously saved state in case any thing goes wrong with your OS. You can configure System Restore for one drive or all drives in your PC, so that when you create a System Restore point, only those drives are restored where this functionality is enabled. To configure System restore, right click on ‘My Computer’ and select Properties. In the left hand side of the properties window, click on the link ‘System protection’.

System restore

This will open up the System protection tab where you can configure System Restore.

System Restore Tab

Here you can see which all drives are having System Restore enabled. You can change the setting by selecting the drive and clicking on Configure button.

Configure System Restore

Here you can turn off or on System Restore for the selected drive and also configure the disk space for System restore by dragging the slider. Since enabling System Restore consumes hard disk space, you can it turn off on drives which does not need them.

Download 3 Beautiful Themes for Windows 7

Windows 7 has been very popular ever since the beta version was released. There are lots of themes being created for Windows 7. Previously we had also written about a trick to reveal hidden themes in Windows 7. Here we are featuring 3 beautiful and also dark themes for Windows 7. For installing these themes, please follow the author’s instructions.

1. Windows7 The Dark Knight Theme :

Windows_7_The_Dark_Knight

Download

2. Windows 7 RED Theme :

Windows_7_RED

Download

3. OneWorld Theme :

OneWorld

Download OneTheme

Hope you liked these theme, if you like to share any more beautiful themes, please leave the URL in the comments and we’ll add it to the post.

IE8 Update for Windows 7 Released

Microsoft has released a ‘compatibility and reliability’ update for Internet Explorer 8, on the Windows 7. This software update is a prerequisite for Windows Internet Explorer 8. This update helps improve compatibility and reliability when you install and use IE8. These updates are the one which are available in IE8 RC released few days back for Vista and XP.

internet-explorer

This updates resolves the following issues:

  • When Internet Explorer 8 is installed with Adobe Flash Player 10, Internet Explorer may become unresponsive.
  • You experience a Print dialog box that is unusable when you try to print an Adobe PDF document.
  • After a crash, Internet Explorer 8 becomes unresponsive, and you must restart the computer to resolve the problem.
  • Internet Explorer 8 may crash when you visit some Web sites.
  • Internet Explorer 8 may crash when you resize the browser window.
  • Internet Explorer 8 does not seem to remember information that was stored in cookies on the computer.
  • Popular third-party extensions cause crashes in Internet Explorer 8.
  • Previously blocked third-party extensions are no longer blocked after you upgrade to Internet Explorer 8.

You can read more about this update at Microsoft support and help center. You can get the update either through Windows update or from here.

[Via]
Transform Windows XP to Windows 7 with Seven Remix XP

If you are still using Windows XP, but need the looks of Windows 7 on your XP, then Seven Remix XP might be of help. Seven Remix XP is an application which was designed to improve the GUI of Windows XP. The installer will replace the resources of your system files. Files that contain icons, images, animations that are extracted from Windows 7, so that your XP will have the look and feel of Windows 7.

Seven_Remix_XP

This installer is designed to work on the following operating systems and languages:

* Windows XP (Home, Pro, RTM, SP1, SP2, SP3, Corporate)
* Windows 2003 (Standard, Enterprise, Datacenter, Web, RTM, SP1)
* Windows Media Center Edition (2003, 2004, 2005)
* Windows XP Tablet PC Edition
* All Language Versions
* Does NOT work with 64 bit versions of Windows

The installer automates the process of substitution of system files. It makes changes to the registry and installs skins and visual extras like sounds, styles, etc. In addition, it makes a backup of its archives in case that it needs to recover them. You can uninstall the pack anytime you don’t need it.

Download Seven Remix XP

How to Download Windows 7 Codecs

If you are using the Windows 7 Beta version, then you might need the codec pack for player video formats which are not natively supported on Windows Media Player. The Windows 7 Codec pack includes the native H264 playback in WMP12 and Media Center and also DXVA accelerated H264 playback is provided by the codec package for all other players. The Windows 7 Code pack supports 18 languages. The default is English and the installer includes support for the following other languages; Chinese Simplified/Traditional, Japanese, Czech, Dutch, Finnish, French, German, Greek, Italian, Norwegian, Portuguese, Russian, Spanish, Polish, Swedish and Turkish.

Codec Pack

The installer will automatically remove most other popular codec releases from your computer before installing this concise yet comprehensive package. You won’t need to make any adjustments or tweaks to enjoy your media content immediately. Windows Media Player and Media Center will instantly recognize all your files as playable.

It does not contain a media player and it does not associate file-types. With this package installed you will be able to use any media player.

Download Windows 7 Code Pack

Change Wallpapers Automatically in Windows 7

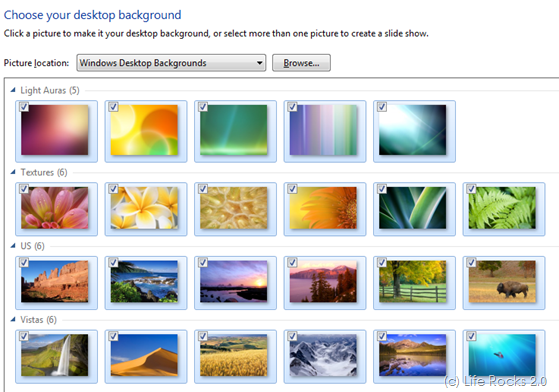
In Windows XP and Vista, if you wanted to change the wallpaper on your desktop automatically, you needed to install third party applications. With Windows 7, a new feature has been added by which you can automatically change wallpapers in Windows 7 after a predefined time. This setting can be enabled from the desktop personalization menu and you can specify any wallpapers you wish.

To rotate wallpapers automatically, right click on the desktop and select Personalize. Towards the bottom of this window, you can see a link to set Windows desktop background.

Personalize Menu

You can select any wallpapers you wish from the hard disk using the browse option. Once you select the background images, you can see the automatic rotation settings enabled below.

Change wallpapers

You can select the time for changing the wallpapers, although there are enough options available, custom time selection is missing here. Click OK and now you can see the setting in action. It changes the wallpaper automatically after the time you have set.

Burn ISO Images in Windows 7

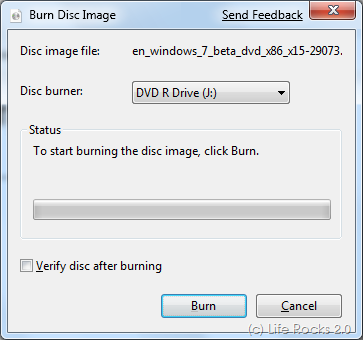
Windows 7 has lots of new features and enhancements when compared to Windows Vista. One such feature available in Windows 7 is the support for burning ISO images without using any third party software. Windows 7 has an in-build feature to burn disk images. The process of burning ISO Images is very simple and easy to use. You don not have to open any application to burn ISO, just double click the ISO image from your computer.

image

This will open up the Burn Disk Image application which shows the status of burning and also has a provision to verify disc after burning. Very simple process and you don’t have to search for any applications for this process.

Windows 7 User Account Control (UAC)

When Windows Vista was launched, User Account Control (UAC) was introduced and many users found this security feature annoying. Although there were many ways to disable UAC in Windows Vista including third party applications, there was very little options to customize UAC. In Windows 7, UAC has been designed based on the feedback received on Vista UAC. There are more options in Windows 7 UAC compared to Vista.

Windows 7 UAC

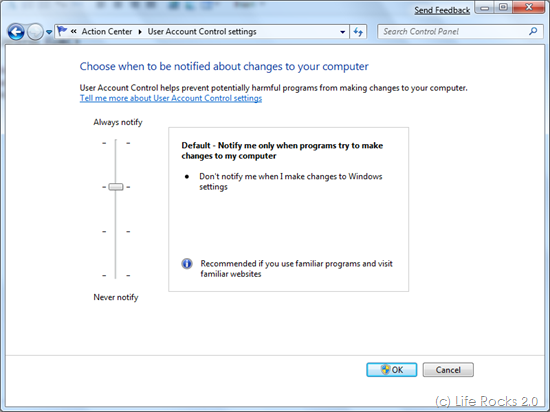
To access UAC in Windows 7, type UAC in the Start menu search bar or you can even navigate from Control Panel-> Action center-> UAC

UAC

The UAC in Windows 7 has four options and second option is set by default which notifies you only when program tries to modify computer. You can enable notification for all changes or disable notification.

Another interesting thing about Windows UAC is that there is an option called “Notify me when program tries to make changes to the computer (do not dim desktop)”. Dimming of the desktop was one of the annoying things in Vista UAC and this problem has been rectified in Windows 7 UAC.

Overall the Windows 7 UAC is very much improved when compared to Vista.

Minimize Windows Live Messenger to System Tray in Windows 7

Windows 7 has one of the major changes in UI in the form of task bar which is called Super taskbar. Windows Live Messenger or any other IM clients generally minimizes to system tray in Windows Vista, but in Windows 7, even when minimized it stays in the task bar. If you feel the task bar gets crowded with icons, you can minimize messengers to system tray using the simple hack.

Task Bar Windows 7

1. First close any running instances of Windows Live Messenger and then open Program files-> Windows Live-> Messenger folder

2. Here you can find msnmgsr.exe file. Right click on the file and select properties.

3. In the properties window, select compatibility tab. Tick the check box for Run this program in compatibility mode for under “Compatibility Mode”, and then select Windows Vista from the drop down list.

Compatibility Mode

4. Click OK and now sign in back to Windows Live Messenger. Now if you minimize the messenger, it goes to system tray.

AntiVirus for Windows 7

Once you have installed Windows 7 Beta, the first thing to do is to install an anti-virus software as Windows 7 itself reminds you to install one. Although Windows 7 is in beta, there are anti-virus software compatible for it. Microsoft has been working with security partners to help them get their applications ready for Windows 7. Three security vendors have taken the build released at the PDC in October and have developed solutions available today that work with the Windows 7 Beta.

Alert from Windows 7

Download anti-virus for Windows 7

  • Symantec offers the Norton 360 3.0 Beta which works on the Windows 7 Beta- Download
  • AVG is offering AVG Internet Security and AVG Anti-Virus that works with the Windows 7 Beta- Download
  • Kaspersky is offering a technical preview of Kaspersky Anti-Virus for Windows 7- Download

Enable Run Command in Start Menu in Windows 7

When you install the Windows 7 beta version, you can see some changes in the start menu when compared to Windows Vista. Similar to Vista, the Run command is not available by default in Windows 7. Many people who are still using Windows XP might want to see the run command in the start menu. Run can be enabled in Windows 7 as well like Vista.

1. Right click on any open area in the start menu and select Properties.

Properties window

2. Select the Start Menu tab in the properties window and click Customize button.

Start menu properties

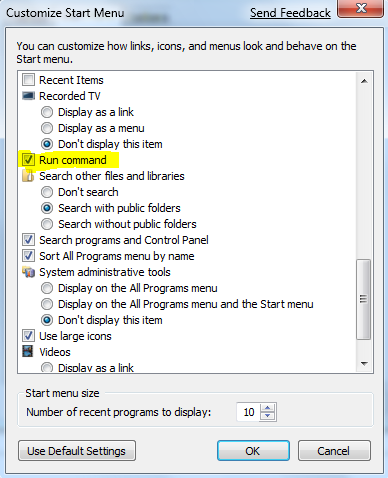
3. In the customize window, check the box against Run Command and click OK.

run command

Now if you open the Start Menu, you can see the Run Command added to it.

Start Menu